Attendances
Odoo’s Attendances application functions as a time clock. Employees are able to check in and out of work using a dedicated device in kiosk mode, while users are also able to check in and out of work directly from the database. Managers can see who is available at any given time, create reports to see everyone’s hours, and gain insights on which employees are working overtime, or checking out of work earlier than expected.
Access rights
Understanding access rights is essential to navigating the Attendances application.
Every user in the database is able to check in and out directly from the database, without needing access to the Attendances app. Additionally, all users can access their own attendance records from their employee form in the Employees app.
Access to both the Attendances application, and the various features within the application is determined by access rights.
To see what access rights a user has, navigate to the , and click on an individual user. The Access Rights tab is visible by default. Scroll down to the HUMAN RESOURCES section to view the settings. For the Attendances field, the options are either to leave the field blank or select Administrator.
If the Administrator option is selected, the user has full access to the entire Attendances application, with no restrictions. They can view all employee attendance records, enter Kiosk Mode from the application, access all reporting metrics, and make modifications to the settings. If left blank, the user does not have access to the Attendances application.
Note
If a user does not have Administrator rights for the Attendances app, they are not able to open the app, even though it appears on the main database dashboard. An Access Error pop-up message appears, stating:
You do not have enough rights to access the fields "attendance_manager_id" on Employee
(hr.employee). Please contact your system administrator.
Users who cannot access the Attendances app can still check in and check out of work within the database, using the (red circle) or (green circle) that are always available at the top of the database.
Approvers
An approver is a user assigned to review and manage an employee’s attendance records. An approver is typically a manager, though that is not required. Approvers without administrative rights can access and modify attendance records only for the employees they are assigned to. This is the only exception where non-admin users can view records in the Attendances app.
To view who the attendances approver for an employee is, navigate to the and click on the specific employee. Click on the Work Information tab, scroll to the APPROVERS section, and check the Attendance field. The person selected is able to view that employees’ attendance records, both on the Attendances application dashboard as well as in the attendance reports, and make modifications to their records.
Configuration
Few configurations are needed in the Attendances app. Determining how employees check in and out, defining how the kiosks function, and determining how extra hours are computed are all set in the Configuration menu. Navigate to the to access the configuration menu.
Note
Any configuration item with an (building) icon is a company-specific configuration. Items without an (building) icon apply to all companies within the database.
Modes
Attendances from Backend : activate this feature to allow users to check in and out directly from the Odoo database. If this is not activated, users must use a kiosk to check in and out of work.
Automatic Check-Out : activate this feature to automatically check out employees according to their working schedule, after a buffer of time has passed.
Tolerance: this field appears only when the Automatic Check-Out feature is enabled. Enter the amount of time, in hours, that must elapse after an employee’s working hours have ended, before they are automatically checked out.
Example
With the Automatic Check-Out option enabled, and the Tolerance set to
2.00 hours, an employee checks in to work at 9:00 AM, and forgets to check-out at 5:00 PM. At
7:00 PM, they are automaticlaly checked out.
Absence Management : activate this feature to log any absences that are not associated with a time off request, such as vacation time or sick time, on the attendances report.
Extra Hours
This section specifies how extra time (sometimes referred to as overtime) is calculated, including when extra time is counted and what time is not logged.
Tolerance Time In Favor Of Company: enter the amount of time, in minutes, that is not counted towards an employee’s overtime. When an employee checks out, and the extra time logged is below the specified minutes, the extra time is not counted as overtime for the employee.
Tolerance Time In Favor Of Employee: enter the amount of time, in minutes, that an employee is given, that does not adversely affect their attendance if they log less time than their working hours. When an employee checks out, and the total time logged for the day is less than their specified working hours and less than this specified grace period, they are not penalized for their reduced hours.
Example
A company sets both of the Tolerance fields to
15minutes, and the working hours for the entire company are set from 9:00 AM to 5:00 PM.If an employee checks in at 9:00 AM, and checks out at 5:14 PM, the extra 14 minutes are not counted towards their overtime.
If an employee checks in at 9:05 AM, and checks out at 4:55 PM, even though they logged a total of 10 minutes less than their full working hours, they are not penalized for this discrepancy.
Extra Hours Validation : tick either the radio button next to Automatically Approved to have all extra time automatically approved, or Approved by Manager if all extra time should be reviewed and approved by a manager.
Display Extra Hours: activate this box to display the extra hours logged by an employee when they check out with a kiosk, or when a user checks out in the database.
Note
Approved extra hours can be deducted from an approved time off request.
Overview
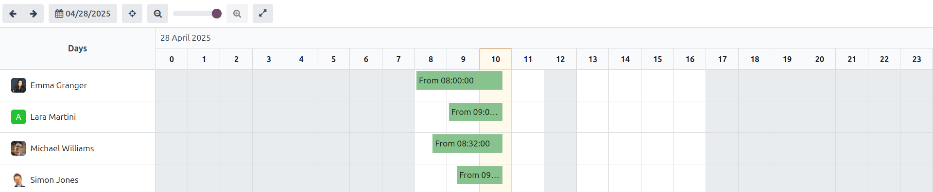
When entering the Attendances application, the Overview dashboard is presented, containing all the user’s check in and check out information. If the user has the required access rights or is an approver for specific employees, those employeess’ check-in and check-out information also appears on the Overview dashboard.
The Attendance dashboard allows switching between (Gantt) and (List) views, and selecting a period to analyze. The current period is automatically highlighted in yellow for real-time attendance records, while the (Focus Today) button instantly returns the dashboard to the present date.
Note
Any entries that have errors appear in red, indicating they need to be resolved by a user with the proper access rights and/or are approvers for the employees with the errors.
Filters and groups
Sometimes, attendance officers and managers need to view specific records, such as all automatic checkouts to determine which employees chronically forget to check-out, or by department, to determine which team is working the most overtime.
For these cases, use the search bar to select a Filters or Group By, or combine these both to present the desired information.
High-value filters
Filter |
Common use case |
|---|---|
At Work |
Verify employees still on-site before shutting down the building for the night, or to perform a head count. |
Errors |
View all errors to correct them prior to payroll processing. |
Automatically Checked-Out |
Perform an audit to determine employees who chronically forget to check-out of work. |
Date |
Limit results to a specific pay-period or audit window. |
Active/Archived Employees |
Switch between current staff and former employees when auditing historical data. |
Insightful groupings
Group by |
When it helps |
|---|---|
Employee |
Review individual attendance records during a 1:1 meeting. |
Department |
Compare staffing levels and working hours to determine over-working and under-working teams. |
Manager |
Determine where attendance follow-up questions can be directed to for an employee. |
Method |
Spot trends in attendance methods to potentially resolve hardware issues. |
Date (Day/Week/Month) |
Identify absenteeism spikes or seasonal patterns. |
Attendance log details
Odoo records both the time and location for every check-in and check-out, with fields varying by the method used. These detailed attendance logs can confirm where an employee was on any given work day. This can be useful for companies with hybrid working schedules, who may need to perform audits to ensure proper compliance.
The detailed attendance log contains the following information:
Main details
Employee: the name of the employee.
Check In: the date and time the employee checked in.
Check Out: the date and time the employee checked out. This only appears if the employee has checked out.
Worked Time: the total amount of time the employee logged for the day, across multiple check-ins and outs. In an hour and minute format (HH:MM).
Worked Extra Hours: approved overtime (shows only when present for the employee).
Extra Hours: unpaid overtime hours worked beyond the expected working schedule (the Worked Time minus the approved Worked Extra Hours.
Check in/check out details
The following information appears for both the Check In and Check Out sections.
Mode: attendance submission method. Can be Systray, Kiosk, or Manual entry.
IP Address: the device’s IP address used to log in or out.
Browser: the web browser the employee used to log in or out.
Localisation: the city and country associated with the computer’s IP address.
GPS Coordinates: the specific coordinates when the user logged in or out. To view the specific coordinates on a map, click the View on Maps button beneath the GPS Coordinates. This opens a map in a new browser tab, with the specific location pointed out.

Attendance errors
Entries that contain an error appear on the overview dashboard in red. In the (Gantt) view, the entry appears with a red background. If in the (List) view, the entry text appears in red.
An error occurs when an employee has checked in but not checked out within 24 hours, or when a single check-in period exceeds 16 hours.
To fix the error, the attendance entry must be modified or deleted. Click on the entry to reveal a pop-up containing the details for that particular entry. To modify the Check In and/or Check Out information, click on the Check In or Check Out field and a calendar selector appears. Click on the desired date, then use the time selector beneath the calendar to select the specific time for the entry. When the information is correct, click Apply.
When all the information on the pop-up is correct, click Save & Close. When the entry no longer has an error, the entry appears in gray instead of red.
To delete an entry, click the red Delete button on the pop-up window instead of making modifications to the entry.
Reporting
To view attendance reports, click Reporting in the top menu. The default report displays each employee’s attendance information for the past 3 months, in a Line Chart.
The default view is a Graph. To view the data in a pivot table, click the Pivot Table button on the top-right of the report. To switch back to the graph view, click the Graph button, located next to the Pivot Table button.
To present different information, adjust the filters and groups in the same way as in the Overview dashboard.
The data can be presented in either a Bar Chart, Line Chart, Pie Chart, Stacked chart, or in Descending or Ascending order. To change the view to any of these charts, click the corresponding button above the displayed chart.
To change the Measures, click the Measures button and select the desired measure from the drop-down menu.
The report can also be inserted into a spreadsheet. Click the Insert in Spreadsheet button and a pop-up appears. Select the desired spreadsheet, and click Confirm.
