New employees
When a new employee is hired, the first step is to create a new employee record. This record is a centralized place where all important information about the employee is stored, including general information, job history and skills, various work information, personal details, payroll-related information, and various settings that affect integrations with other apps in the database.
To begin, open the app, then click the New button in the upper-left corner. Doing so reveals a blank employee form.
Proceed to fill out the required information, along with any additional details.

Note
The current company phone number and name are populated in the Work Phone and Company fields. If the Appraisals application is installed, the Next Appraisal Date field is populated with a date six months from the current date.
General information
Fill out the following employee details.
Tip
The employee form automatically saves as data is entered. However, the form can be saved manually at any time by clicking the (Save manually) icon.
Employee’s Name: enter the employee’s name. This field is required.
Job Position: this field appears below the employee name and can be filled in manually. Alternatively, select a position from the drop-down menu in the Job Position field beneath the Department field to auto-populate the top field. The two fields do not need to match.
Example
While it is recommended to have the job positions match, the typed-in description in this top field can contain more specific information than the selected drop-down Job Position, if desired.
For instance, if someone is hired for a sales representative position configured as Sales Representative in the Recruitment app, that can be selected in the drop-down Job Position field.
In the typed-in Job Position field beneath the Employee’s Name, the position can be more specific, such as
Sales Representative - Subscriptionsif the employee is focused solely on subscription sales.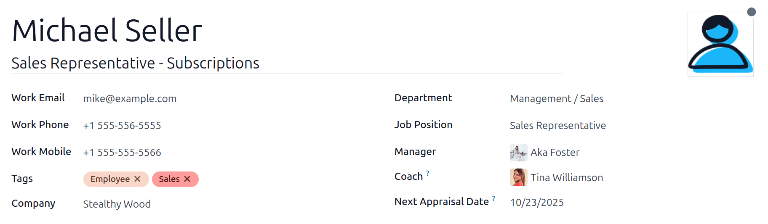
Photo: in the top-right image box of the employee form, click on the (Edit) icon, then select a photo to upload.
Work Contact Information: enter the employee’s Work Email, Work Phone, and Work Mobile, information, if not already auto-populated.
Tags: select a tag from the drop-down menu to add relevant tags to the employee. Any tag can be created in this field by typing it in. Once created, the new tag is available for all employee records. There is no limit to the amount of tags that can be added on an employee form.
Company: from the drop-down menu in this field, select the company the new employee was hired by, or create a new company by typing the name in the field, and clicking Create or Create and edit… from the mini drop-down menu that appears. This field is required.
Department: select the employee’s department from the drop-down menu.
Job Position: select the employee’s job position from the drop-down menu. If using the Recruitment app, this list reflects configured job positions. Once a selection is made, the Job Position field beneath the Employee’s Name field automatically updates to reflect the currently selected job position, but is still editable.
Manager: select the employee’s manager from the drop-down menu.
Coach: select the employee’s coach from the drop-down menu.
Next Appraisal Date: this field is only visible if the Appraisals application is installed. The date automatically populates with a date that is computed according to the settings configured in the Appraisals application. This date can be modified using the calendar selector.
Note
After a Department is selected, the department’s configured manager and coach automatically populates the respective Manager and Coach fields.
Tip
To make edits to the selected Department, Manager, Coach, or Company, click the (Internal link) arrow next to the respective selection. The (Internal link) arrow opens the selected form, allowing for modifications. Click Save after any edits are made.
Resumé tab
Resumé
Enter the employee’s work history in the Resumé tab. Each resumé line must be entered individually. When creating an entry for the first time, click Create a new entry, and the Create Resumé lines form appears. After an entry is added, the Create a new entry button is replaced with an ADD button. Enter the following information for each entry.
Title: type in the title of the previous work experience.
Employee: select the employee from the drop-down menu.
Type: from the drop-down menu, select either Experience, Education, Social Media, or Internal Certification. To create a new Type, enter the name of the type, then click Create “(Type)”.
Display Type: from the drop-down menu, choose Classic for typical work experience, or Certification for experience gained through a certification.
Duration: enter the start and end dates for the work experience. To select a date, click the first empty field to reveal a calendar pop-up window. Proceed to use the (left arrow) and (right arrow) icons to scroll to the desired month, then click on the day to select it. Repeat this process to locate and select the end date. When the desired dates have been selected, click Apply.
Description: enter any relevant details in this field.
Once all the information is entered, click the Save & Close button if there is only one entry to add, or click the Save & New button to save the current entry and create another resumé line.

Note
After the new employee form is saved, the current position and company is automatically added to
the Resumé tab, with the end date listed as current.
Skills
An employee’s skills can be entered in the Resumé tab in the same manner that a resumé line is created.
In order to add a skill to an employee record, the skill types must first be configured. By default, Odoo comes with two Skill Types preconfigured: Languages and Soft Skills. Configure the rest of the skill types before adding any skills to the employee record.
When adding the first skill to an employee record, a Pick a skill from the list button appears in the Skills section of the Resumé tab. Click the Pick a skill from the list button, and select the following information for each skill.
Skill Type: select a skill type by clicking the radio button next to the skill type.
Skill: after selecting a Skill Type, the corresponding skills associated with that selected Skill Type appear in a drop-down menu. For example, selecting Language as the Skill Type presents a variety of languages to select from under the Skills field. Select the appropriate preconfigured skill from the list.
Important
If the desired skill does not appear in the list, it is not possible to add the new skill from this window. New skills must be added from the Skill Types dashboard.
Skill Level: pre-defined skill levels associated with the selected Skill Type appear in a drop-down menu. First, select a Skill Level, then the progress bar automatically displays the pre-defined progress for that specific skill level. Skill levels can be created and modified from the Skill Types dashboard.
Click the Save & Close button if there is only one skill to add, or click the Save & New button to save the current entry and immediately add another skill.
At any point, a new line can be added by clicking the ADD button next to the corresponding section.

Important
Only users with Officer: Manage all employees or Administrator rights for the Employees app can add or edit skills.
Skill types
In order to add a skill to an employee’s form, the Skill Types must be configured. Go to to view the currently configured skill types and create new skill types.
Note
The default skill of Languages is preconfigured with twenty-one skills, and the default Soft Skills is preconfigured with fifteen skills.
Click the New button in the upper-left corner, and a new Skill Type form appears. Fill out the following details for the new skill type. Repeat this for all the needed skill types.
Skill Type: enter the name of the skill type. This acts as the parent category for more specific skills and should be generic.
SKILLS: click Add a line, and enter the Name for the new skill, then repeat for all other needed skills.
LEVELS: click Add a line, and enter a Name and Progress percentage (
0-100) for each level.Set a Default Level by clicking the toggle on the desired line (only one level can be selected). The toggle turns green to indicate the default level. Typically, the lowest level is chosen, but any level can be selected.
DISPLAY: click the colored box next to the Color field to reveal a list of available colors for the skill type. Click on a color to select it.
Example
To add a math skill set in yellow, enter
Mathin the Name field. Then, in the Skills field, enterAlgebra,Calculus, andTrigonometry. Next, in the Levels field enterBeginner,Intermediate, andExpert, with the Progress listed as25,50, and100, respectively. Click Set Default on theBeginnerline to set this as the default skill level. Last, click the colored box next to Color, and select yellow.
Tip
Once the form is completely filled out, click the (Save manually) icon at the top of the screen, and the Levels rearrange in descending order, with the highest level at the top, and the lowest at the bottom, regardless of the default level and the order they were entered.
Work information tab
The Work Information tab contains job-related details such as the employee’s schedule, roles, approvers (for time off, timesheets, and expenses), remote work setup, and work location.
Click on the Work Information tab to access this section, and enter the following information for the new employee, for the various sections listed below.
LOCATION
This section is visible for all employees, and does not require any other apps to be installed for this section to be visible.
Work Address: select the Work Address from the drop-down menu. The current company populates this field, by default. To modify the address, hover over the first line (if there are multiple lines) of the address to reveal an (Internal Link) arrow. Click the (Internal Link) arrow to open up the company form, and make any edits.
Use the breadcrumb links to navigate back to the new employee form when done.
If a new work address is needed, add the address by typing it in the field, then click Create (new address) to add the address, or Create and edit… to add the new address and edit the address form.
Work Location: using the drop-down menu, select where the Work Address is located. The default options are Home, Office, or Other.
To add a new location, type in the location name, then click Create (new location) to add the location, or Create and edit… to add the location, assign a Work Address, and a Cover Image.
APPROVERS
To see this section, the user must have either Administrator or Officer: Manage all employees rights set for the Employees application. For the category to appear, the respective app must be installed. For example, if the Time Off app is not installed, the Time Off approver field does not appear. Only one selection can be made for each field.
Important
The users that appear in the drop-down menu for the Approvers section must have Administrator rights set for the corresponding human resources role.
To check who has these rights, go to and click Manage Users in the Users section. Then, click on an employee, then click into the Access Rights tab. Scroll to the HUMAN RESOURCES and check the various settings.
In order for the user to appear as an approver for Expenses, they must have either Team Approver, All Approver, or Administrator set for the Expenses role.
In order for the user to appear as an approver for Time Off, they must have either Officer:Manage all Requests or Administrator set for the Time Off role.
In order for the user to appear as an approver for Timesheets, they must have either Officer:Manage all contracts or Administrator set for the Payroll role.
In order for the user to appear as an approver for Attendances, they must have Administrator set for the Payroll role.
Expense: using the drop-down menus, select the user responsible for approving all expenses for the employee.
Time Off: using the drop-down menus, select the user responsible for approving all time off requests from this employee.
Timesheet: using the drop-down menus, select the user responsible for approving all the employee’s timesheet entries.
Attendance: using the drop-down menus, select the user responsible for approving all attendance entries for the employee.
REMOTE WORK
This section only appears if the Remote Work setting is enabled in the configuration menu.
Use the drop-down menu to select the default location the employee works, for each day of the week. The default options are Home, Office, or Other.
A new location can be typed into the field, then click either Create (new location) to add the location, or Create and edit… to add the new location and edit the form.
After edits are done, click Save & Close, and the new location is added, and populates the field.
Leave the field blank (Unspecified) for non-working days, such as Saturday and Sunday.
Note
It is also possible to add or modify work locations by navigating to . To modify a location, click on an existing location, then make any changes on the form.
Click New to create a new location, then enter the following information on the form. All fields are required.
Work Location: enter the name for the location. This can be as general or as specific, as needed, such as
HomeorBuilding 1, Second Floor, respectfully.Work Address: using the drop-down menu, select the address for the location.
Cover Image: click on the icon to select it for the Cover Image. Options are a (home) icon, an (building) icon, and a (map marker) icon.
Company: using the drop-down menu, select the company the location applies to. The current company populates this field, by default. This field only appears in a multi-company database.

SCHEDULE
This section defines when the employee is expected to work.
Working Hours: using the drop-down menu, select the hours the employee is expected to work. By default, a Standard 40 hour/week working schedule is available. If the Timesheets app is installed, an Appointment Resource Default Calendar option is also available.
To view and modify the specific daily working hours, click the (Internal link) arrow at the end of the Working Hours line. Working hours can be modified or deleted here.
Note
Working Hours are related to a company’s working schedules, and an Employee cannot have working hours that are outside of a company’s working schedule.
Each individual working schedule is company-specific. For multi-company databases, each company must have its own working hours set.
If an employee’s working hours are not configured as a working schedule for the company, new working schedules can be added, or existing working schedules can be modified.
Working hours can be modified in the Payroll application, where they are referred to as Working Schedules.
For more information on how to create or modify Working Schedules in the Payroll application, refer to the Payroll documentation.
After the new working time is created, or an existing one is modified, the Working Hours can be selected on the employee form.
Timezone: using the drop-down menu, select the timezone for the employee.
PLANNING
This section is only visible if the Planning app is installed, as this section affects what the employee can be assigned in the Planning app.
Roles: using the drop-down menu, select all the roles the employee can perform. There are no preconfigured roles available, so all roles must be configured in the Planning app. There is no limit to the number of roles assigned to an employee.
Default Role: using the drop-down menu, select the default role the employee will typically perform. If the Default Role is selected before the Roles field is configured, the selected role is automatically added to the list of Roles.
Private information tab
No information in the Private Information tab is required to create an employee, however, some information in this section may be necessary for the company’s payroll department.
In order to properly process payslips and ensure all deductions are accounted for, it is recommended to check with the accounting department and payroll department to ensure all required fields are populated.
Enter the various information in the following sections and fields of the Private Information tab. Fields are entered either using a drop-down menu, ticking a checkbox, or typing in the information.
Note
Depending on the localization setting, other fields may be present. For example, for the United States, a SSN No (Social Security Number) field is present.
PRIVATE CONTACT
Private Address: enter the employee’s private home address.
Private Email: enter the employee’s personal email address.
Private Phone: enter the employee’s personal phone number.
Bank Account: enter the bank account number for the employee, and click Create and edit... A Create Bank Account form loads with the bank account number populating the Account Number field. Next, select the Bank using the drop-down menu.
If the bank is not already configured, click Create and edit… and a blank Create Bank form loads, with the bank name populating the Bank field. Next, enter the Bank Identifier Code, also referred to as a BIC or SWIFT code. Then enter the Bank Address, Phone, and Email. Once the form is complete, click Save & Close, and the new bank populates the Bank field.
Next, enter the ABA/Routing number for the bank account, then select the Account Holder, which is typically the employee.
Finally, click the Send Money toggle. This changes the toggle color to green, and the status changes from Untrusted in black text, to Trusted in green text.

Important
All bank accounts must be marked as Trusted, if not payments cannot be processed and sent to the bank account. Having an Untrusted bank account for an employee will cause an error in the Payroll application.
Home-Work Distance: enter the number, in miles or kilometers, the employee commutes to work, in one direction. The unit of measure can be changed from kilometers (km) to miles (mi) using the drop-down menu. This field is only necessary if the employee is receiving any type of commuter benefits or tax deductions based on commute distances.
Private Car Plate: enter the license plate for the employee’s personal car.
EMERGENCY
This section details the person to contact in the event of an emergency.
Contact Name: enter the emergency contact’s name.
Contact Phone: enter the emergency contact’s phone number. It is recommended to enter a phone number that the person has the most access to, typically a mobile phone.
FAMILY STATUS
This section is used for tax purposes, and affects the Payroll app. Enter the following information in the fields.
Marital Status: select the marital status for the employee using the drop-down menu. The default options are Single, Married, Legal Cohabitant, Widower, and Divorced.
If Married or Legal Cohabitant is selected, two additional fields appear: Spouse Complete Name and Spouse Birthdate. Enter these fields with the respective information.
Number of Dependent Children: enter the number of dependent children. This number is the same number used for calculating tax deductions, and should follow all tax regulations regarding applicable dependents.
CITIZENSHIP
This section outlines all the information relating to the employee’s citizenship. This section is primarily for employees who are working in a different country than their citizenship. For employees working outside of their home country, for example on a work visa, this information may be required. Information for all fields may not be available.
Nationality (Country): using the drop-down menu, select the country the employee is from.
Identification No: enter the employee’s identification number in this field.
SSN No: enter the employee’s social security number.
Passport No: enter the employee’s passport number.
Gender: select the employee’s gender from the drop-down menu. The default options are Male, Female, and Other.
Date of Birth: using the calendar selector, select the birthday of the employee.
Place of Birth: enter the city or town the employee was born.
Country of Birth: using the drop-down menu, select the country the employee was born.
Non-resident: tick this checkbox if the employee lives in a foreign country.
EDUCATION
This section allows for only one entry, and should be populated with the highest degree the employee has earned.
Certificate Level: using the drop-down menu, select the highest degree the employee has earned. The default options are Graduate, Bachelor, Master, Doctor, and Other.
Field of Study: type in the subject the employee studied, such as
BusinessorComputer Science.School: type in the name of the school the employee earned the degree from.
WORK PERMIT
This section should be filled in if the employee is working on some type of work permit. This section may be left blank if they do not require any work permits for employment.
Visa No: enter the employee’s visa number.
Work Permit No: enter the employee’s work permit number.
Visa Expiration Date: using the calendar selector, select the date the employee’s visa expires.
Work Permit Expiration Date: using the calendar selector, select the date the employee’s work permit expires.
Work Permit: click Upload your file, then navigate to the work permit file in the file explorer, and click Select to add the permit.
Payroll tab
Depending on the installed localization, the sections and fields in this tab may vary considerably. Due to the specific nature of localizations and the variety of information that may be requested in this tab, it is recommended to check with the accounting department to fill out this section correctly.
The following fields are universal for all localizations:
Legal Name: enter the legal name for the employee. This is the name that typically is used for filing taxes.
Payslip Language: enter the desired language to be used when printing payslips for this employee.
Registration Number of the Employee: enter the employees registration number.
See also
Settings tab
This tab provides various fields for different applications within the database. Depending on what applications are installed, different fields may appear in this tab.
STATUS
Employee Type: using the drop-down menu, select the type of employee. The default options are Employee, Worker, Student, Trainee, Contractor, and Freelancer.
Related User: using the drop-down menu, select a user in the database to link to this employee.
Important
Employees do not need to be users of the database.
Employees do not count towards the Odoo subscription billing, while Users do count towards billing. If the new employee should also be a user, the user must be created.
After the employee is created, click Create User at the end of the Related User line. A Create User form appears.
The employee name populates the Name field by default. If the Email Address, Phone, Mobile, and photo are populated on the employee form, the corresponding fields are auto-populated on the Create User form.
Once the form is completed, click the Save button. The user is created, and populates the Related User field.
Users can also be created manually. For more information on how to manually add a user, refer to the Users document.
APPLICATION SETTINGS
This section affects the Fleet and Manufacturing apps. Enter the following information in this section.
Hourly Cost: enter the hourly cost for the employee, in a XX.XX format. This cost is factored in when the employee is working at a work center.
Note
Manufacturing costs are added to the costs for producing a product, if the value of the manufactured product is not a fixed amount. This cost does not affect the Payroll application.
Fleet Mobility Card: if applicable, enter the Fleet Mobility Card number
ATTENDANCE/POINT OF SALE
This section determines how employees sign in to either the Attendances or Point Of Sale apps, and only appear if either of these apps is installed.
PIN Code: enter the employee’s pin number in this field. This code is used to sign in and out of Attendances app kiosks, and a POS system.
Badge ID: click Generate at the end of the Badge ID line to create a badge number. Once generated, the badge number populates the Badge ID field, and Generate changes to Print Badge. Click Print Badge to create a PDF file of the employee’s badge. The badge can be printed and used to log into a POS system or check-in on an Attendances app kiosk.